Saturday, March 26, 2011

Vote for Us!

I had no idea, but this blog I follow, Saturday Mornings, is having a contest for March and our new coffee table made the finals!

So vote for us!


And you can vote once a day from now to April Fools Day.  Help us out?  Go down to the bottom of the post and scroll 'til you see "Wheeled Coffee Table (Reef Botanicals)."  That's us!

Friday, March 25, 2011

Cake Decorating: Class Two, Day Two

We actually had homework for this class, to cover another larger "cake" tier (read:  styrofoam) with fondant.  I learned a few things:

1.  Pay attention to the calendar.  On Monday night, I was frantic to get it done for Tuesday's class, not realizing it was actually for Thursday's class.

2.  If you have fondant that's been opened, even if it's in a plastic bag you think is sealed, check it out before you start kneading it.  Unbeknownst to me, the bad had torn a bit, and the fondant on that side had hardened to a rock.  It was just along the edge, and I didn't need all the fondant, but it was definitely rocky.  And I didn't think to check it.  So when I started kneading, I found that I was kneading pebbles throughout my fondant, which was really annoying.  I tried to pick them out, but there were a lot so I gave up.  It meant lumps in my fondant and an inability to roll it as thin as I should have, but no one was eating it anyway, so I just rolled with it.

Behold the homework:


See the white spots?  Yeah, fondant pebbles.

I brought it to class anyway.  And here's what I did with it...


I love fleur de lis, and I love the whole Mardi Gras theme!  And those appliqués in between are textured too.

And then I finished off the top tier.


Together, it looks like this.


Not bad, right?  Not perfect, by any stretch of the imagination, but not bad.  And yes, this was a Topsy Turvy class.  And no, the cake's not topsy turvy.  Vanessa did give us styrofoam to form a wedge to make it topsy turvy, but I don't have any dowels for it.  And honestly, the fondant at this point is hard as a rock.  I'm not sure I could get a dowel through it to hold the cake together.  So I just get a two-tier cake and the knowledge of how to make it topsy turvy.

Eric has requested, and I think I'd love to try, a topsy turvy Mardi Gras themed cake for our annual Mardi Gras in June party.  How awesome would that be?!

Wednesday, March 23, 2011

Cake Decorating: Class One, Day Two

Today was the second and final session of my Gift Box cake decorating class.  It was so fun!  I don't think I mentioned it before, but the class is taught by award-winning pastry chef Vanessa Greeley.  You can see what she can do on her website.  If you look at her portfolio (and accolades), you'll see why I'm so excited to learn from her.  I'm nowhere near her level.  Look, this is what we did today:


Not bad, by any stretch of the imagination, but nowhere near the awesome Halloween cake or frog cake on her site.  I'll keep working at it, though!

And when you consider the fact that at 7 p.m. tonight when class started, I didn't even know how to cover a square cake with fondant, I did a pretty nifty job with that.


And then, from my experience in the Thursday Topsy Turvy class, I was right on the ball with marking where I wanted the overlay of fondant to be cut.


If you notice in the photo with the overlay, I textured the top of it.  And then I had to get fancy with some fleur de lis appliqués.  Then I went a little nuts, doing the bottom of the box with a different texture, and more appliqués around the corners.


I did the bow on top, but had to bring it home with those rolled paper towels in the loops to keep them open 'til the fondant dried.  Didn't want a collapsed bow, after all!

And so I ended up with my final product, the photo at the top of this post.  Not bad, if I do say so myself!

One more class on Thursday, and then I'm kind of raring to decorate a real cake!

Sunday, March 20, 2011

Artist Spotlight: Part Forty & Forty-One

I have for you today... a biker... who makes pretty jewelry.  Betcha were't expecting that, were you?  Seriously, though.  The chick who rides one of these


made this.


Yes, really.  Her name is Tammy, and she sells her wares as Tams Jewelry on Artfire, Etsy, Zibbet, and the Handmade Artists Shop, as she calls them, her "art galleries."  And it is art.  Stuff like this...


Plus, she also vends at trade shows, with her husband Jesse and her two daughters.


Although she's tried many crafts over the years, it's jewelry that got her addicted.  It's a good addiction, I think, in light of what she makes available from it!


Get to know her on her blog!

*****

And the other artist I have for you?  Kristen, the Jewelry Geek!  A navy wife with an 11-year-old son, she's going to be getting her Masters in Library Science.  She's been making jewelry since she was just a little older than her son.


Her experience has paid off, I'd say!


You can buy Jewelry Geek items on Etsy, see all her nifty stuff on her website, or really get to know her on her blog.


Check 'em both out!

Monday, March 14, 2011

Is It Still Sawdust If It's From Sanding?

I've probably mentioned that we have expensive taste, Eric and I.  We can't help it.  Show us 100 photos of anything, and without even knowing we're doing it, we'll pick the most expensive one.

And we wanted a new coffee table, preferably one on wheels.

See, last year for Valentine's Day, we bought ourselves a Wii and Wii Fit.  We both really feel like we need to be more in shape, and when it's not walking weather, the Wii is a great way to go.  Plus, it's really fun.  We're both competitive too, so we can easily "encourage" (read:  ridicule) each other to try harder on it.  What we had, though, was a big, heavy octagonal glass coffee table, which is not easy to move.  I had it from before we were married.  In the old place, our living room was formatted differently, and we could work around it.  Not so much in this place, cool as the house may otherwise be.

So... yeah.  Wheeled coffee table.

I did a quick online search, and found this table, at Restoration Hardware.  For about $1,000, with shipping.  Huh.

Well, Eric did a search, and he found this.


That right there is the photo that was posted on eBay, of the exact same sort of factory cart that Restoration Hardware uses.  We went crazy over it, jumping out of our skin to "win" it (or... y'know... win the right to purchase it, since that's what an auction actually is), and we got it for $305!!!

So we took a road trip out to PA and got it into the Jeep.


And then into our driveway.


It was ours!  Mwahahahahaha (can you see me rubbing my hands together like an evil genius here?) hahaha!


Every rusty bit of it!  Doesn't look like much, I know.  But wait.

First order of business... taking the whole thing apart.  Yikes.


Second, getting off as much of the rust as possible, with wire brushes, a wire brush attachment to a drill, and naval jelly.


It was a messy job.


And then we had to prime and paint the iron pieces.


We used an easier method for the nuts and bolts, letting them soak in a bowl of vinegar first.


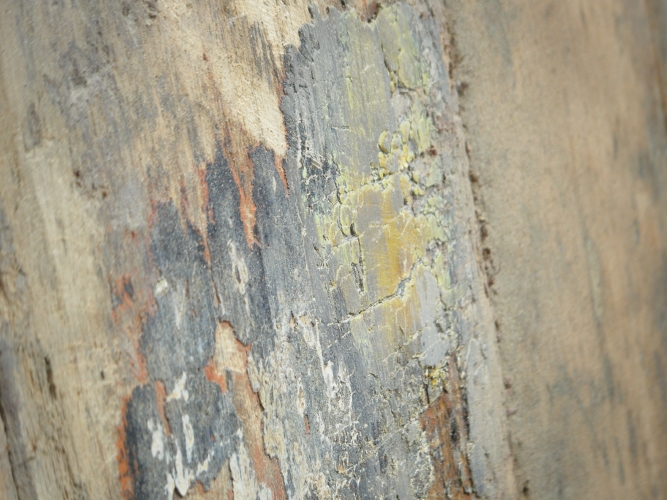
The wood was in desperate need of sanding.  Scraping too, since it looks like somewhere along the line someone painted it with some thick oil paint.


I love the smell of sawdust (sanddust?), but I think I breathed an awful lot of it in.  That, combined with the advent of spring and the starting of leaf buds on the trees, gave me a very sneezy time of it.


When we turned it over to sand the bottom, we discovered something pretty cool.  Someone had written 7/6/27.  We know that these carts were used to transport large items in factories, like furniture, from about 1900 to the 1930s.  Could it be that this one was built in 1927?


Neat, right?

Anyway, then I stained it.  We chose Ipswich Pine.  We both have an affinity for reddish-toned wood but wanted something fairly light and natural.  It came out darker than we thought it would, but we love it, and it looks great with our other furniture.


We could have sanded it further, or even planed it down smooth, but we really like that it looks so weathered.  It's got history.  And you can't tell from the photo, but if you touch it, the wood is really soft and smooth from all the sanding we did do.

Once it dried, it came inside, and everything went back on.  It took a lot of muscle, so I left it mostly to Eric.


I touched up the flat black enamel paint on the cast iron, and waxed the wood to protect it.  So we went from this...


... to this.


Love!

Shared with:
Related Posts with Thumbnails