(Sorry, no Monty Python sketch forthcoming. Instead, you get the post I foreshadowed here.)
See, I'm a member of the
Handmade Artists' Forum, and they decided it'd be nifty to hold a forum-wide challenge. I happened to agree, so I joined in. This was not a soaping challenge. It was a general craft challenge. The challenge? It was to take any type of pre-made shirt and revamp it in a creative way. We could update an old shirt into a nicer shirt, or turn it into something completely different.
I kinda did both. You'll see.
We then had to post before and after photos of the shirts and what became of them.
(See the contest
here. If I win, I get $25, plus a bunch of free advertising for Reef Botanicals, on 4 different websites, plus a writeup on the Handmade Artists Forum blog! Anyone who votes, and then comments on the blog, is entered to win a $25 gift certificate to any and all of the
Handmade Artists Shops!)
I started with this shirt:
And then in the process of creating my challenge project, I realized I wanted a second shirt, so I got this one.
So far, so good. Have shirts, will revamp, yes?
Well, it's been a long time since I did anything with fabric. A
long time. The last thing I remember making with fabric was this poodle skirt. This photo was taken in October of '99, so that should give you an indication of the minimum time ago in which I picked up a needle and thread to do more than sew a button or fix a hem.
And yes, needle and thread. My mother, who
can sew,
hates to sew. Chalk that up to a nasty old home economics teacher when she was a kid. But the upshot is that we've never owned sewing machines in my family. I made that skirt, oh-so-many-years-ago, with a needle and thread and a pattern I bought together with the felt and rickrack. This project was begun and has mostly been made the same way. It makes sense, though, what with the challenge being for a
handmade forum!
So... I began to draw and then pin, as I was taught in 7th grade by my thankfully nice home economics teacher.
And then, I began to sew. And I have a question. How did a
tomato become the go-to shape for pin cushions? No, really, how did it happen? There are lots of round things in the world. Who thought about sewing and keeping pins and thought: Tomato! Eureka!
All I know is that my mother has a tomato pin cushion in her sewing box, and when I went to the store to develop my own sewing box, all they seemed to have were the very same tomato pin cushions.
And there's always that tiny tomato hanging off the side...
Anyway, as I said, I began to sew. It went pretty quickly, and I got most of it done one day while I was watching my nephew.
I changed the shape a bit as I went, but I managed all those teeny tiny stitches. Any ideas what I was making yet? OK, once I finished sewing, cut it out, and turned it right-side-out, you might know.
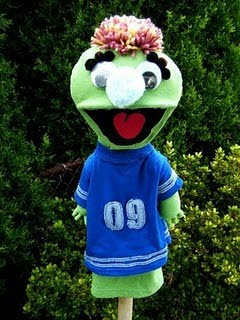
A puppet! And not just a sock puppet, a real hand puppet!
At this point, I took a break. The next part, you see, was something that was out of my comfort zone, and I actually had to search for a how-to on it.
The mouth. I wanted this to be a good puppet you see, a real puppet. With a real mouth board. So I found the instructions online, bookmarked them, and then waited. I was afraid I'd ruin the puppet. Finally, I got the courage, and cut a slit for the mouth.
Yikes, that one simple cut made me nervous. For the board, I used a plain ol' shipping box
(thank you, USPS). I cut a piece, and folded it in half, scored the back of the fold with a scissor, then cut out the mouth shape.
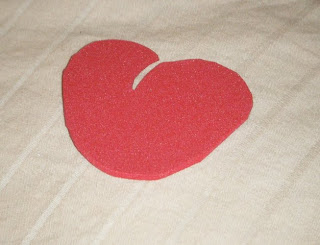
I had black and red foam sheets in the house, so I lined the mouth in black, and cut out the red to be a tongue.
Huzzah for hot glue guns! I am almost as skilled with a glue gun as a I am with needle and thread.
We have a mouth! Now to give said mouth to the puppet. Right. A careful insertion and some more hot glue...
Puppet's got a mouth! I hadn't thought of a name for him and still haven't got one. The only thing I did know at this point was that he was going to be a boy puppet, and when the contest was over, I'd give him to my nephew. So either my sister and I will come up with a name... or my nephew will once he starts talking.
Anyway, once he had a mouth, I knew where his nose would go, so I sewed it on.
Then I stuffed his arms and head with some poly-fill I had in my craft cabinet. I also inserted a foam sheet I cut into a circle into his head to keep the stuffing up top.
Added eyes... it was back to the hot glue for this bit.
At this point, I hated to put him down, I was on such a roll, and he was looking so cute! But I did; it was late, and I didn't want to forge on and make any mistakes in my tired state.
I was excited about the puppet, though, so on another more recent night when I couldn't sleep, I started in on his eyebrows. In the same pack as the large blue pompom I used for his nose, were these small brown and black pompoms that I was able to use for his eyebrows.
I pulled a slew of them, but ended up only needing three per eye. I think they came out really cute!
I did make one mistake, though. In sewing them on, since I preferred the security of sewing them rather than gluing, I probably should've unstuffed his head before I began. I didn't do so, and therefore suffered all the stabs and jabs that could otherwise have been avoided. It's a good thing Eric's a heavy sleeper, because I was jumping and yelling in pained surprise quite a bit.
Then I went to work with the blue t-shirt, using it to make a shirt for puppet. Thing is, the t-shirt as purchased was way too big for puppet, so I had to make a completely new, much smaller shirt out of the one I purchased. I sort of measured it out, mostly eyeballing it, pinned it, and started to sew. Of course, on this bit Catimus decided to get in on the act. I spent more time prying the thread from her claws and jaws than I did sewing.
The deceptive beastie would pretend to be bored with the string and snuggle in my lap or play with my hair... and then when I finally stopped expecting the need to fight her off, there she was again, grabbing the thread or chomping down on it.
I put aside the puppet's shirt for a bit, while I added some hair. This yarn is actually pretty old. It's left over from latch hook rug kits I did many, many years ago. Sometimes there's a benefit to never throwing anything away "just in case!" My "just in case" has finally arrived for this stuff!
It was after this, that my birthday arrived, and I was surprised by the arrival of my
brand new sewing machine! This changed my plans - I'd undo the portion of the puppet's t-shirt that I'd already started to sew, and do the whole thing with my brand new machine!
Since I hadn't used a sewing machine in over 26 years, I first read the manual, and especially how to wind the bobbin and load the thread. What a refresher that was! Then I found an appropriate font and printed this.
I wanted puppet's t-shirt to be a sports shirt, and since I'd be giving this to my nephew, "09" seemed appropriate as his birth year. Cutting the numbers out was easy enough, with my nice, sharp scissors.
Since the "wrong" side of the denim was lighter and offered a better contrast on the navy t-shirt fabric, I traced the numbers on the "right" side of an old pair of jeans I cut up for the purpose.
Cutting those out wasn't quite as easy as the paper versions, but not bad. Even though I was just putting the number on the front of the shirt, I made two copies of the numbers, just in case. This was going to be, after all, my very first time using a sewing machine since at least 1984.
And then I started to sew. It turned out to be a good thing I did two sets of numbers. I botched my first attempt at sewing on the 0 (forgot to put the foot down!) and ended up shredding it pretty badly when I removed it. Once the numbers were on, I cut denim strips for the striping at the bottom of the shirt and the sleeves.
This part was much easier to sew, so I had some fun with a zigzag stitch on both the back and front pieces of the shirt.
I cut the puppet's sleeves from the t-shirts sleeves, and here's an indication of the size ratio, and why I had to make a whole new shirt from the original T.
I used the same zigzag stitch to sew the striping onto the sleeves, made the sleeves, and attached them to the shirt.
Then I cut off the collar of the original t-shirt, cut it shorter, and sewed it onto the neckline of the t-shirt I'd made, so the puppet would have a finished-looking shirt.
Throughout the process, I used the finished edges of the existing t-shirts to give the puppet and his shirt those same finished edges.
I dressed him...
And he's done! (Drumroll please) Ta da!
And his trip to the backyard (in which I got riddled with mosquito bites):
Now... don't forget to go vote
here! Again, if you vote and then comment on the blog,
you are then entered to win a $25 gift certificate to any and all of the
Handmade Artists Shops!
And tell me.... what would you have done with a shirt?
This post was submitted to


